AI Chat Genesys
Connect your AI chat assistant to Genesys Cloud so that when a visitor needs a human, the conversation every message exchanged so far transfers instantly to a live contact-center agent. No copy-and-paste, no repeated questions, no dropped context.
What this module does
When a visitor is chatting with your AI assistant and the AI (or the visitor) decides a human agent is needed, this module:
- Sends the full conversation history to Genesys Cloud.
- Routes the visitor into the correct queue inside Genesys.
- Keeps the chat window open so the visitor continues in the same conversation now with a live agent.
Think of it as a warm hand-off: the agent can read everything that was already said before they type their first word.
Before you start
You will need:
- A Genesys Cloud account with administrator access.
- Access to your organisation's VPN you must be connected to the VPN to access the Genesys org and to configure Genesys settings inside the tenant admin.
- The AI Chat module already enabled on this tenant.
You must be connected to your organisation's VPN to access the Genesys Cloud org and to configure Genesys settings inside the tenant admin panel. Without VPN access these steps will not be reachable.
How to enable the module
- Go to Configuration → Features in the admin panel.
- Search for AI Chat Genesys.
- Click Enable.
Review the feature dependencies below and enable any that are not already active.
Feature and dependency map
CloudSolutions.AIChat.Genesys
- Feature ID:
CloudSolutions.AIChat.Genesys - Name:
AI Chat Genesys - Description: Enables seamless transfer from AI to Genesys Cloud contact center agents with full conversation context.
- Category:
Artificial Intelligence
Configuration checklist
- Enable the
CloudSolutions.AIChat.Genesysfeature in Orchard Core. - Complete the Genesys Cloud setup steps below (Architect → OAuth → Webhook → Data Actions → Messaging → Routing).
- Navigate to Configuration → Settings → Genesys and fill in the Genesys credentials.
- Open each AI Profile and configure the Integrations tab.
Genesys Cloud Setup
All Genesys Cloud configuration is done first in Genesys Cloud. Once complete, you bring the values back into the tenant admin. You must be on the VPN for both steps.
Step 1 Create the Inbound Message Flow in Architect
Build this first everything else routes into it.
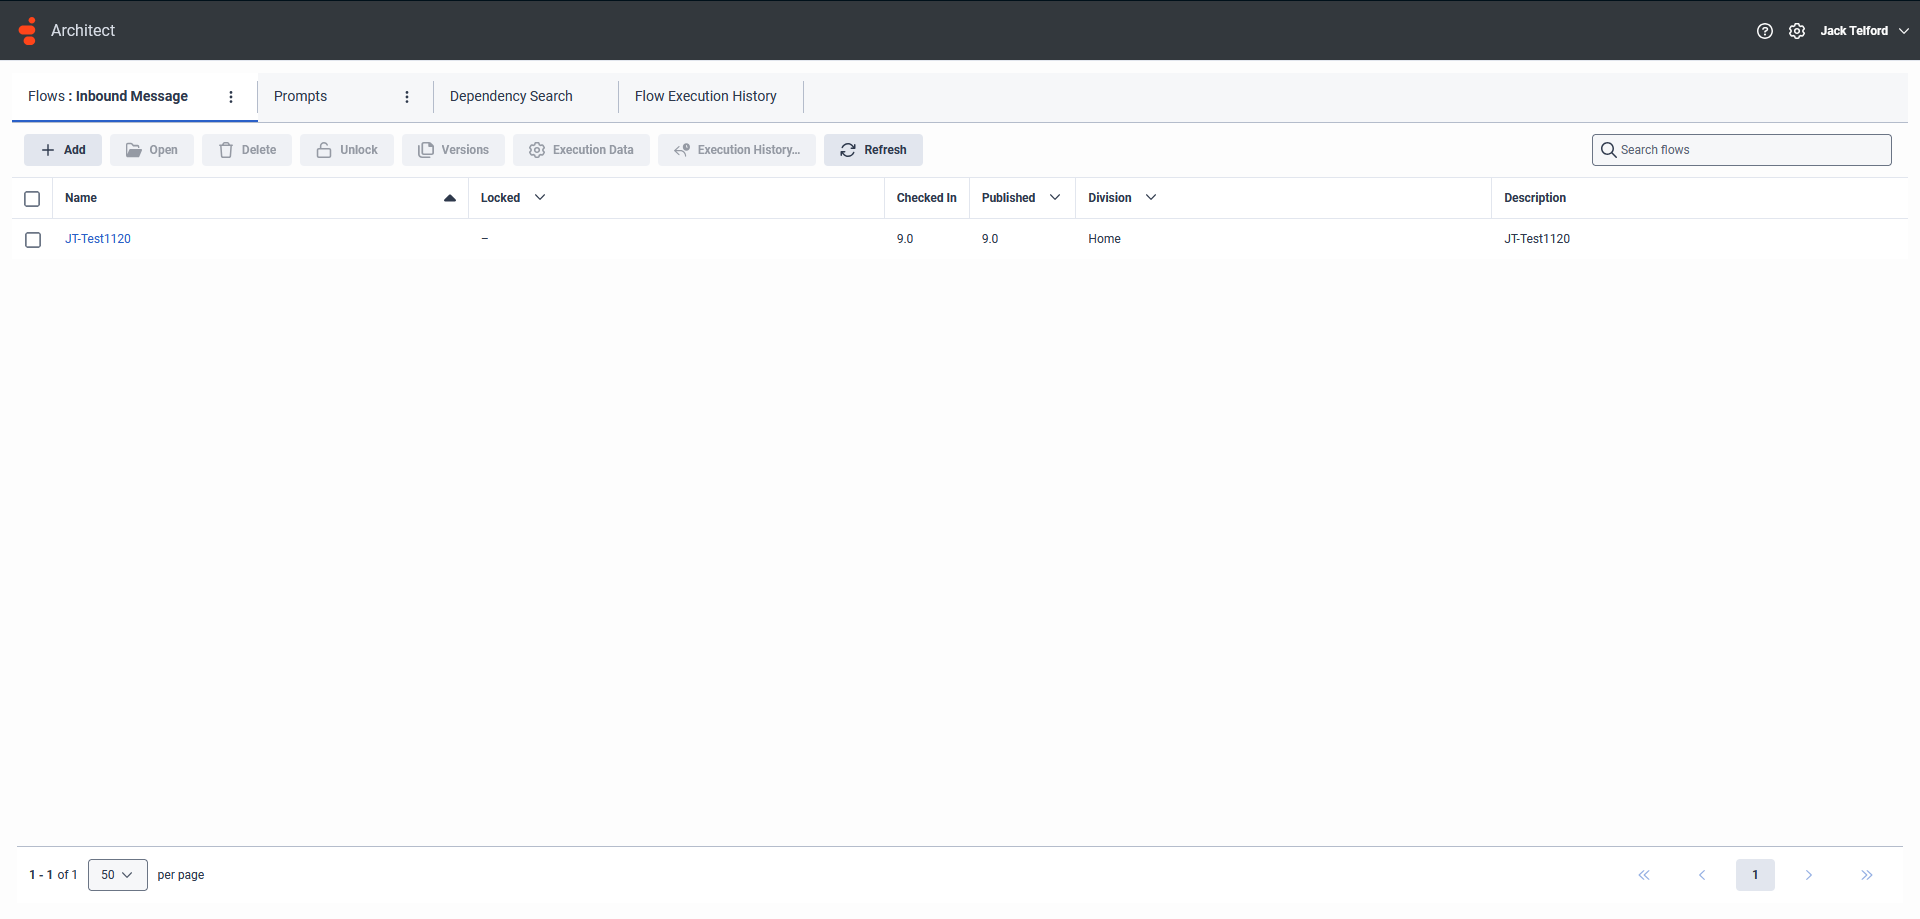
Navigate to Architect → Flows → Inbound Message and click + Add to create a new flow.
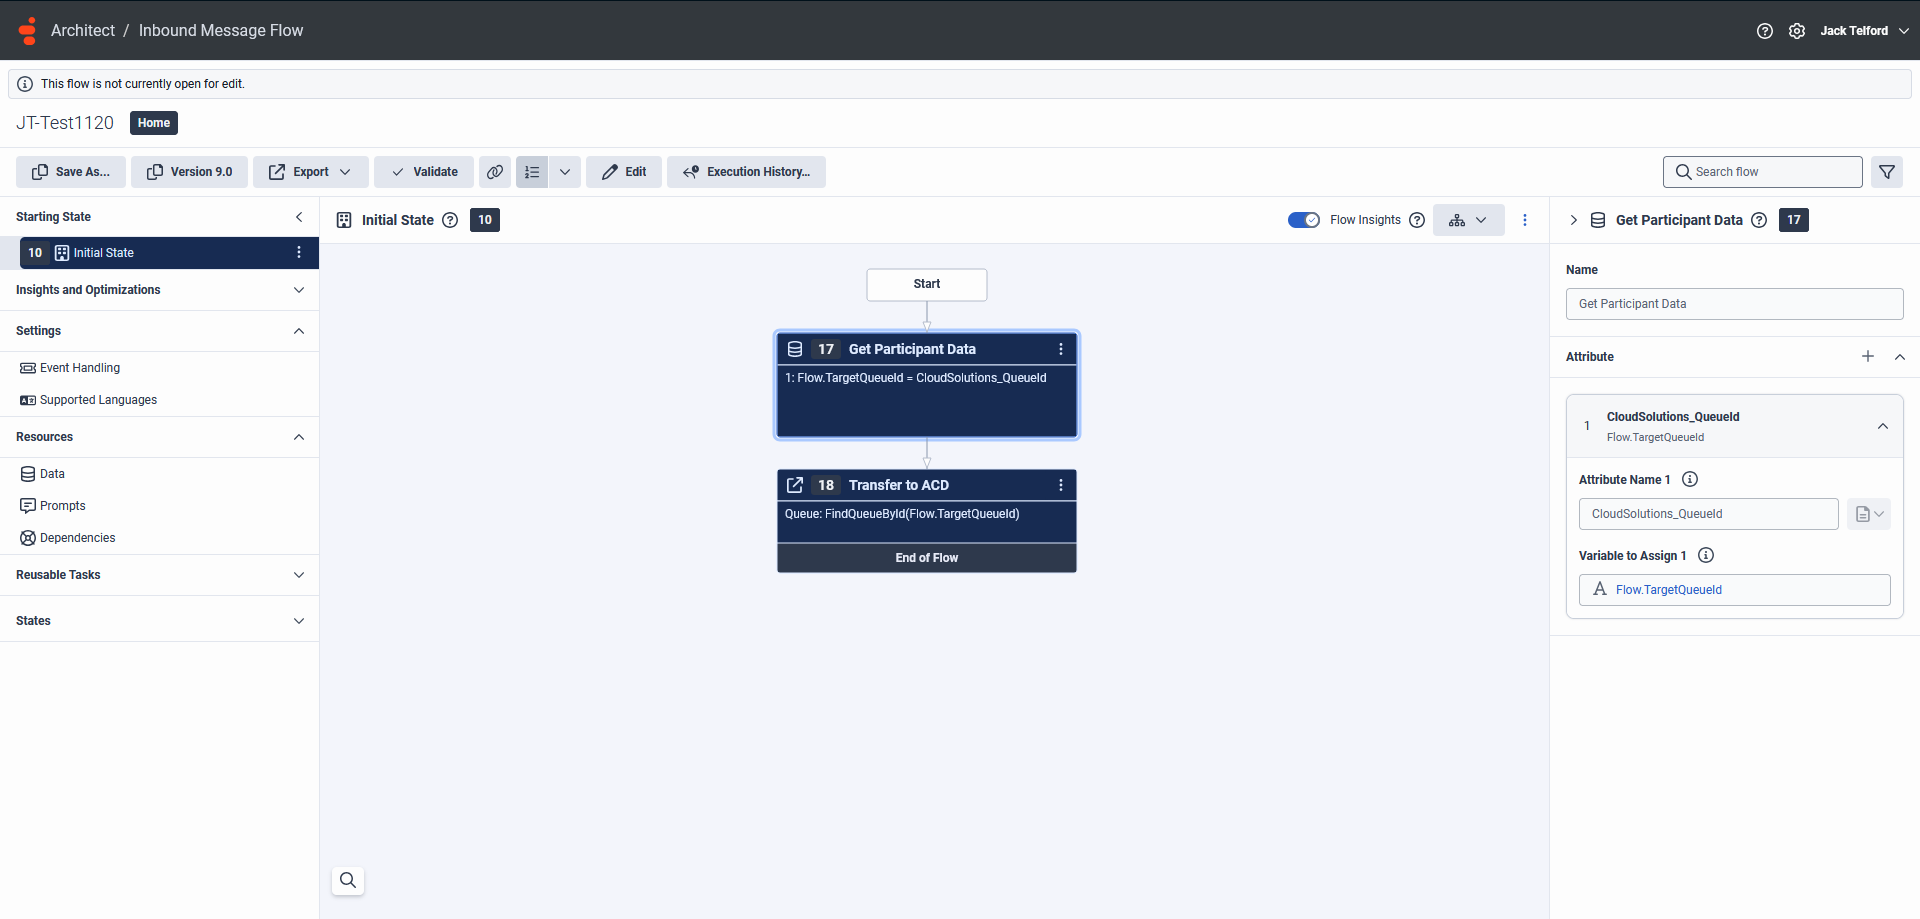
Inside the flow editor, build the routing logic with two actions after Start:
First, go to the Data tab and create a variable:
- Name:
Flow.TargetQueueId
The following names must be exact. If they are cased incorrectly or mistyped your platform will not receive messages.
Then add two actions:
- Set Participant Data set the participant data name to
CloudSolutions_QueueId. This is the exact name the application listens for. Set its value to the variableFlow.TargetQueueIdyou created above. - Transfer to ACD transfers the conversation into your chosen queue.
In the Transfer to ACD action panel, set the Queue field to:
FindQueueById(Flow.TargetQueueId)
Leave all other fields (Priority, Queue Agent, Language Info, ACD Skills) at their defaults unless your organisation has specific routing requirements.
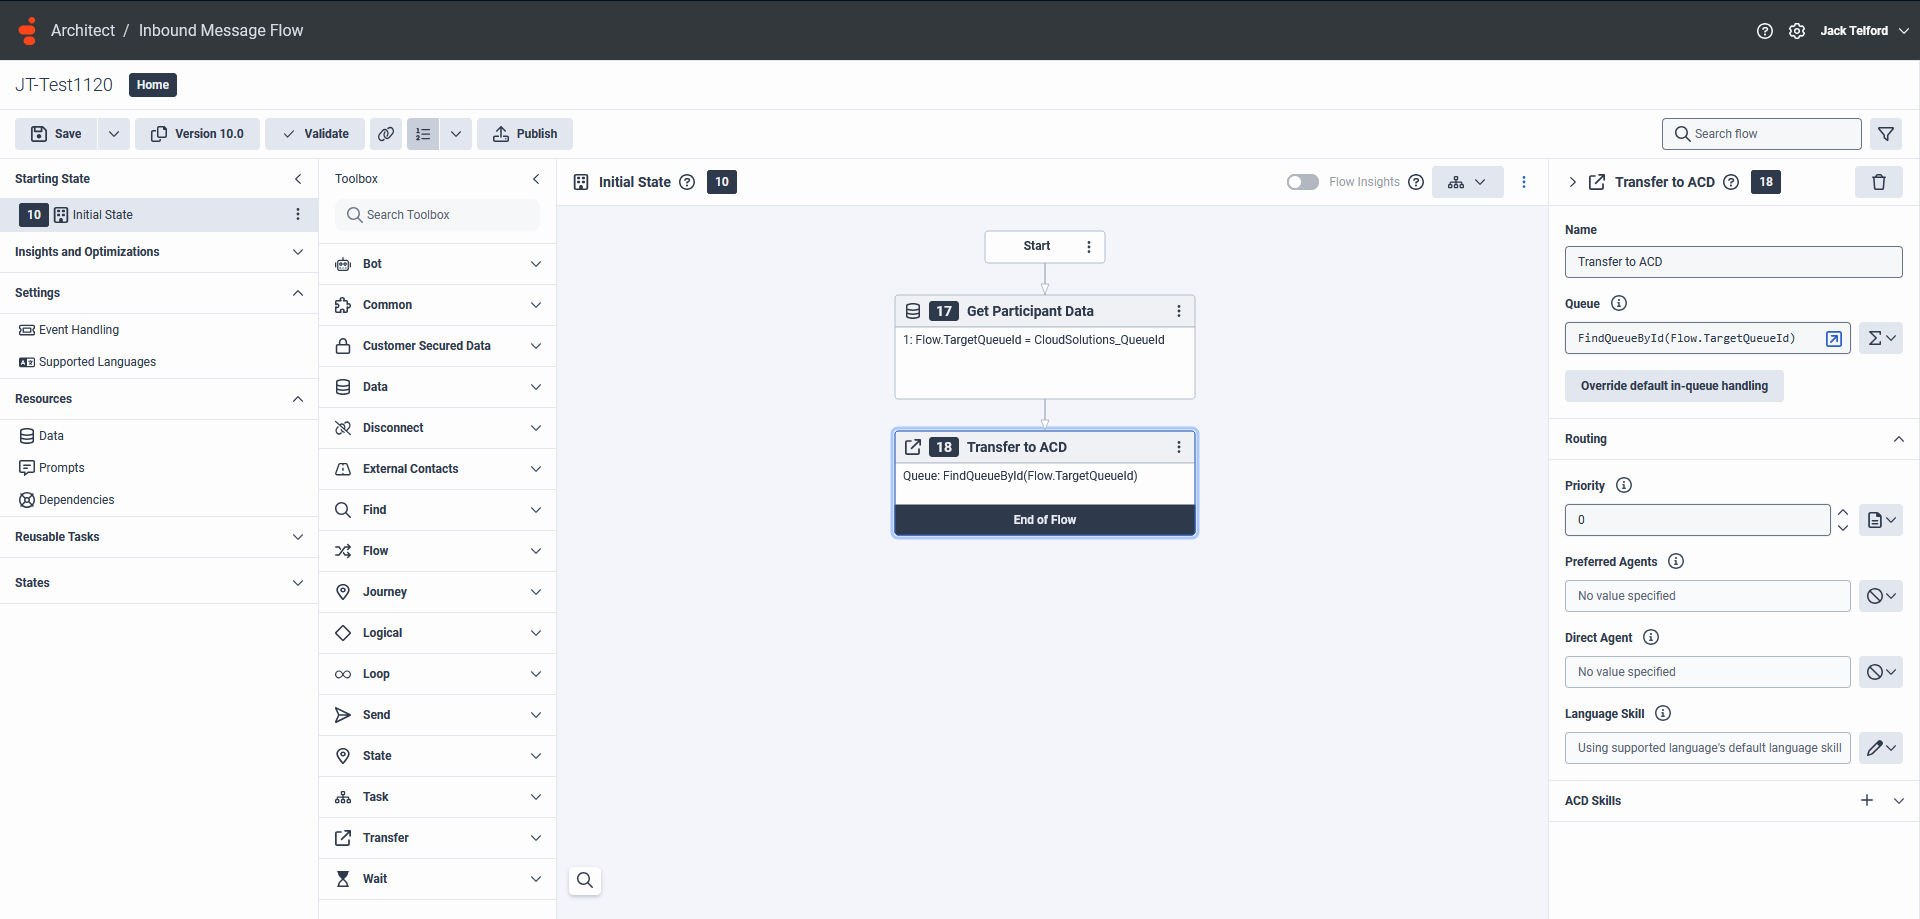
Once configured, click Publish at the top of the editor.
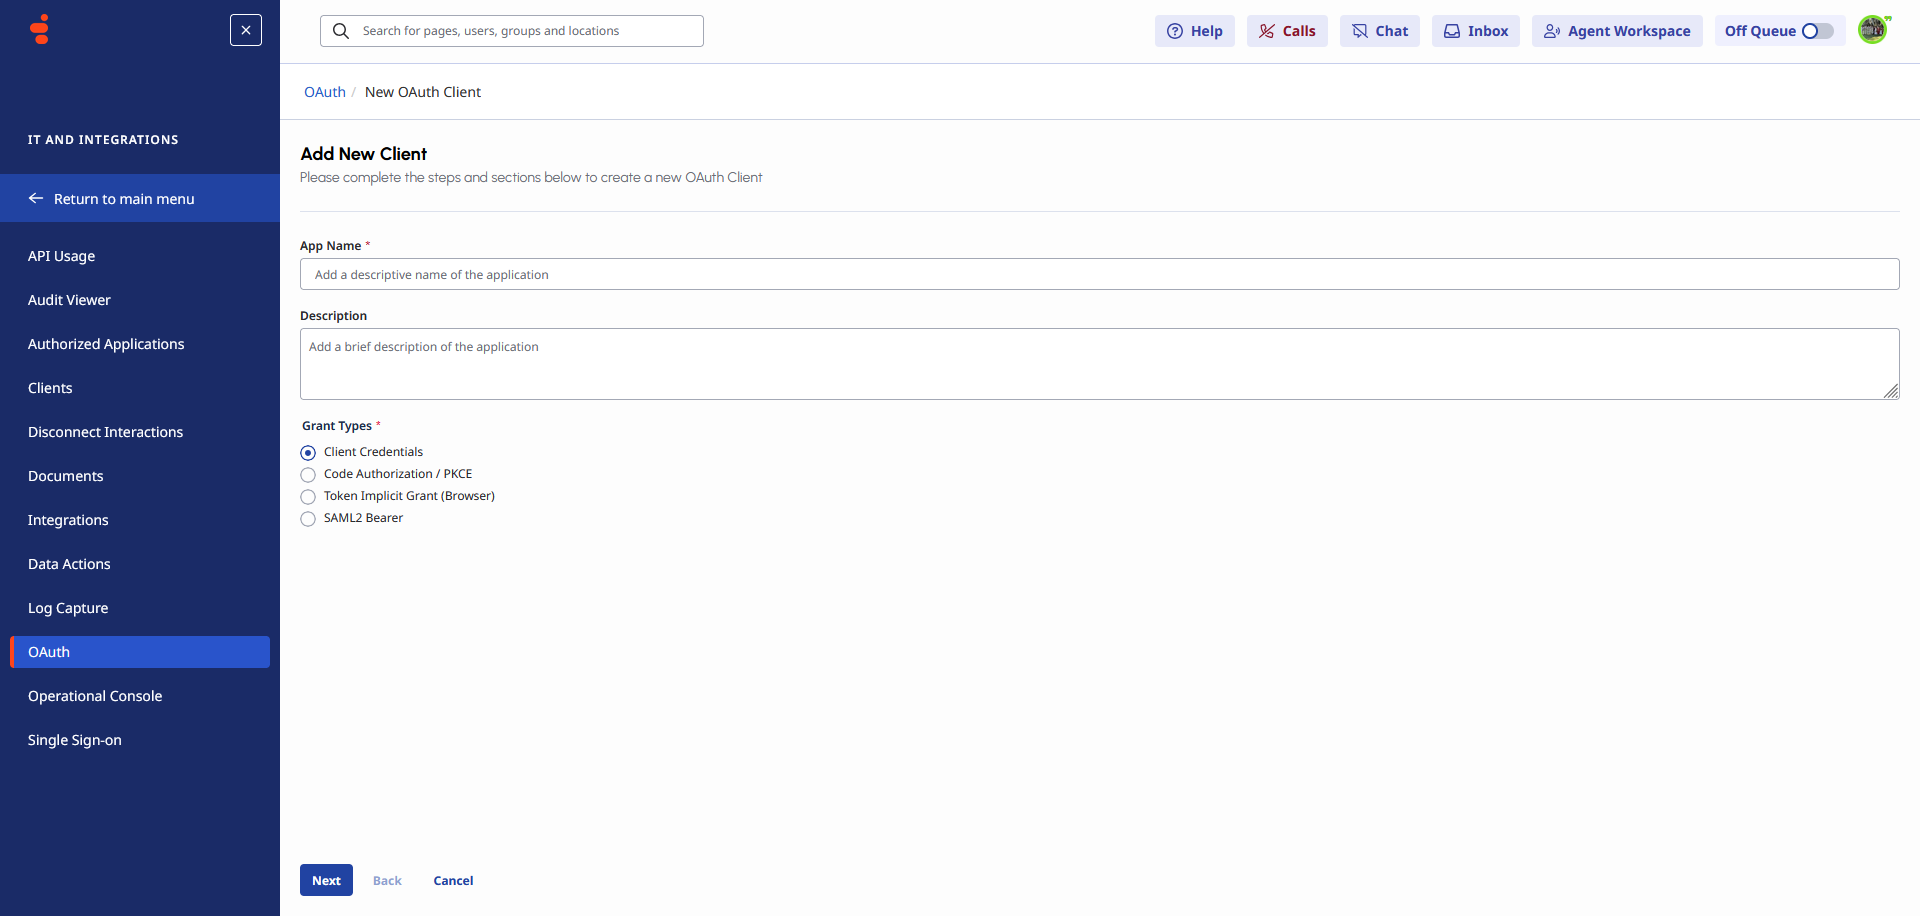
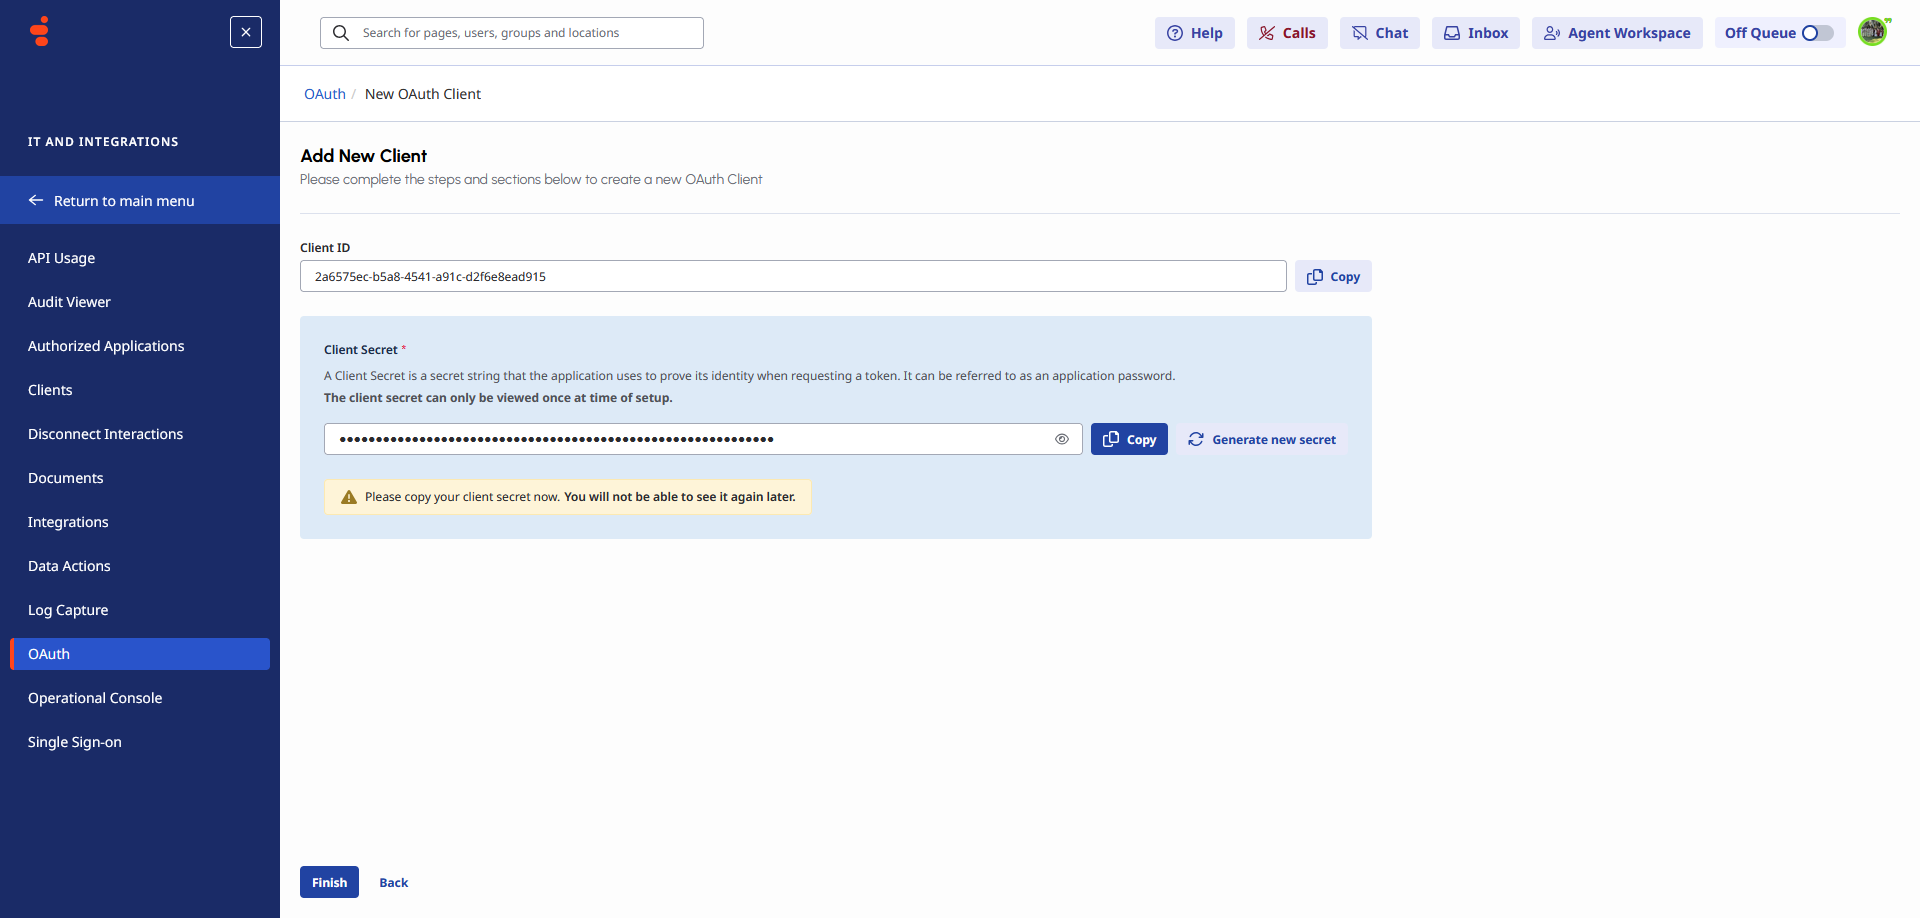
Step 2 Create an OAuth Client
Navigate to Admin → Integrations → OAuth and click Add Client. Give it a name (e.g. CloudSolutions AI Chat), leave the description optional, and under Grant Types select Client Credentials. Then click Save.
After saving, Genesys will display your Client ID and Client Secret. Copy both values immediately especially the secret, as Genesys will not show it again once you leave this page. Paste these into the Genesys Admin Settings in your tenant (Configuration → Settings → Genesys).
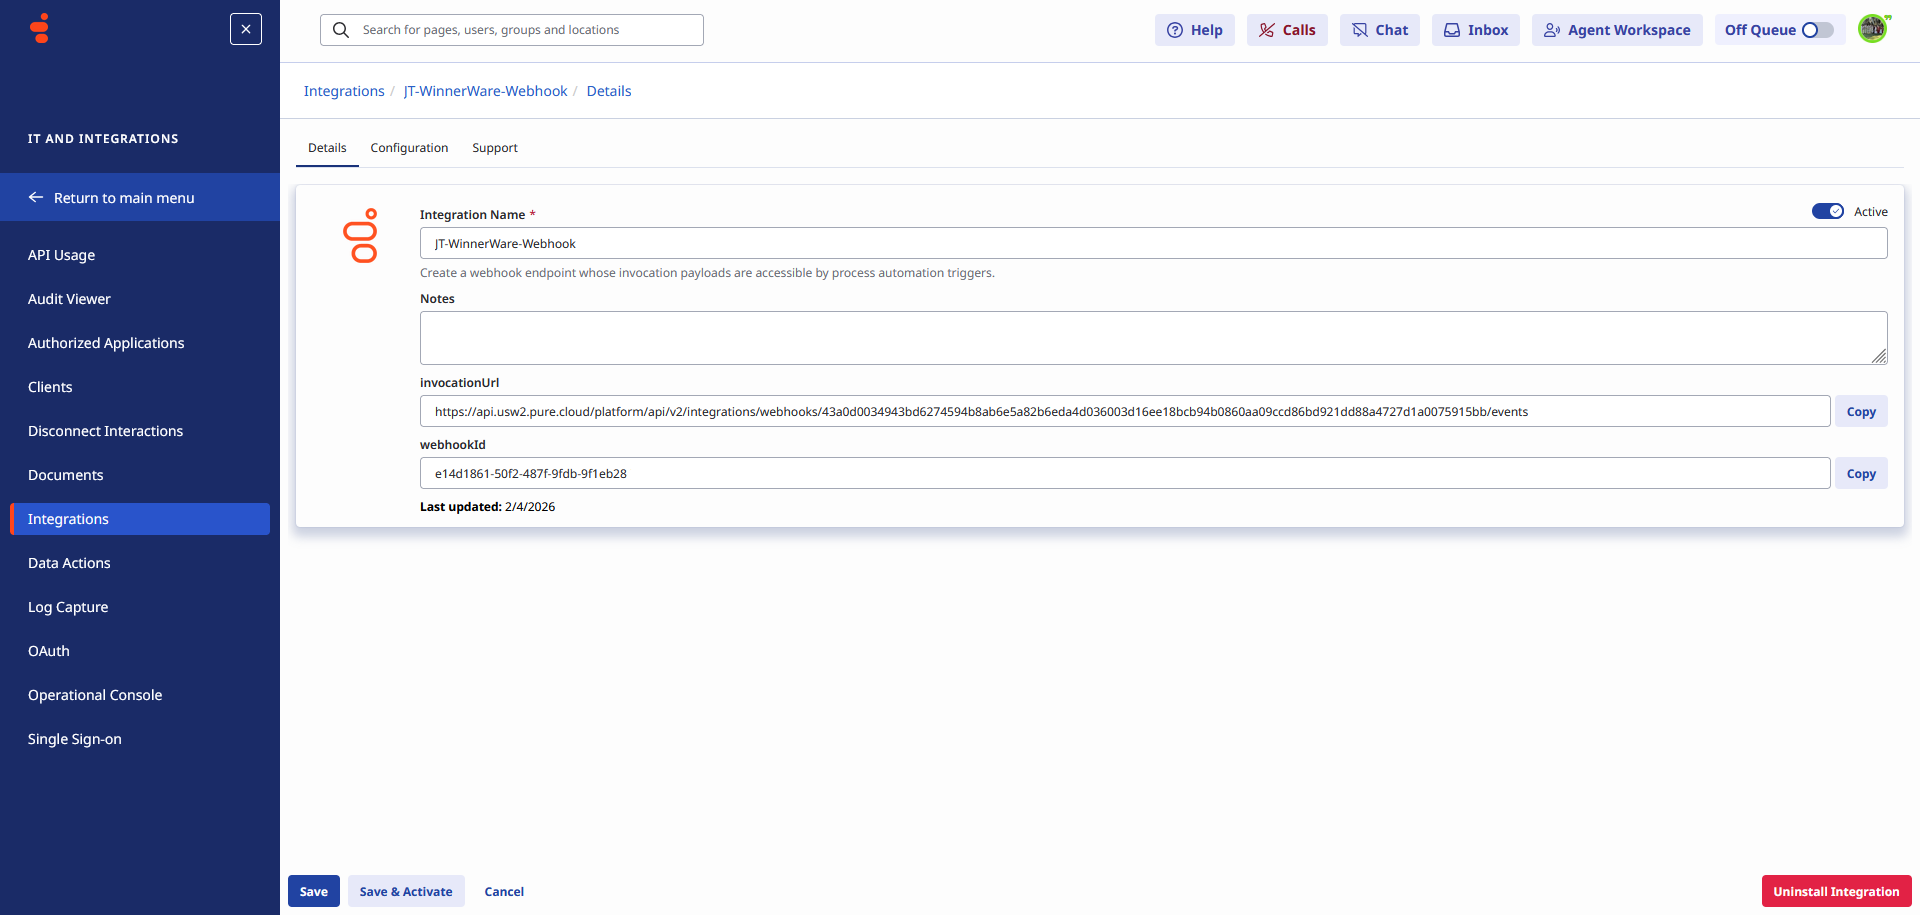
Step 3 Create a Webhook Integration
Navigate to Admin → Integrations and click Add Integration. From the integration type list, select Webhook for Events. Give it a name such as CloudSolutions-WinnerWare-Webhook and continue.

Once created, Genesys will display the webhook configuration page. Set the integration to Active using the toggle. Note the InboundUrl and WebhookToken values these are generated by Genesys and will be needed when configuring the connection on the platform side. Click Save & Activate when done.
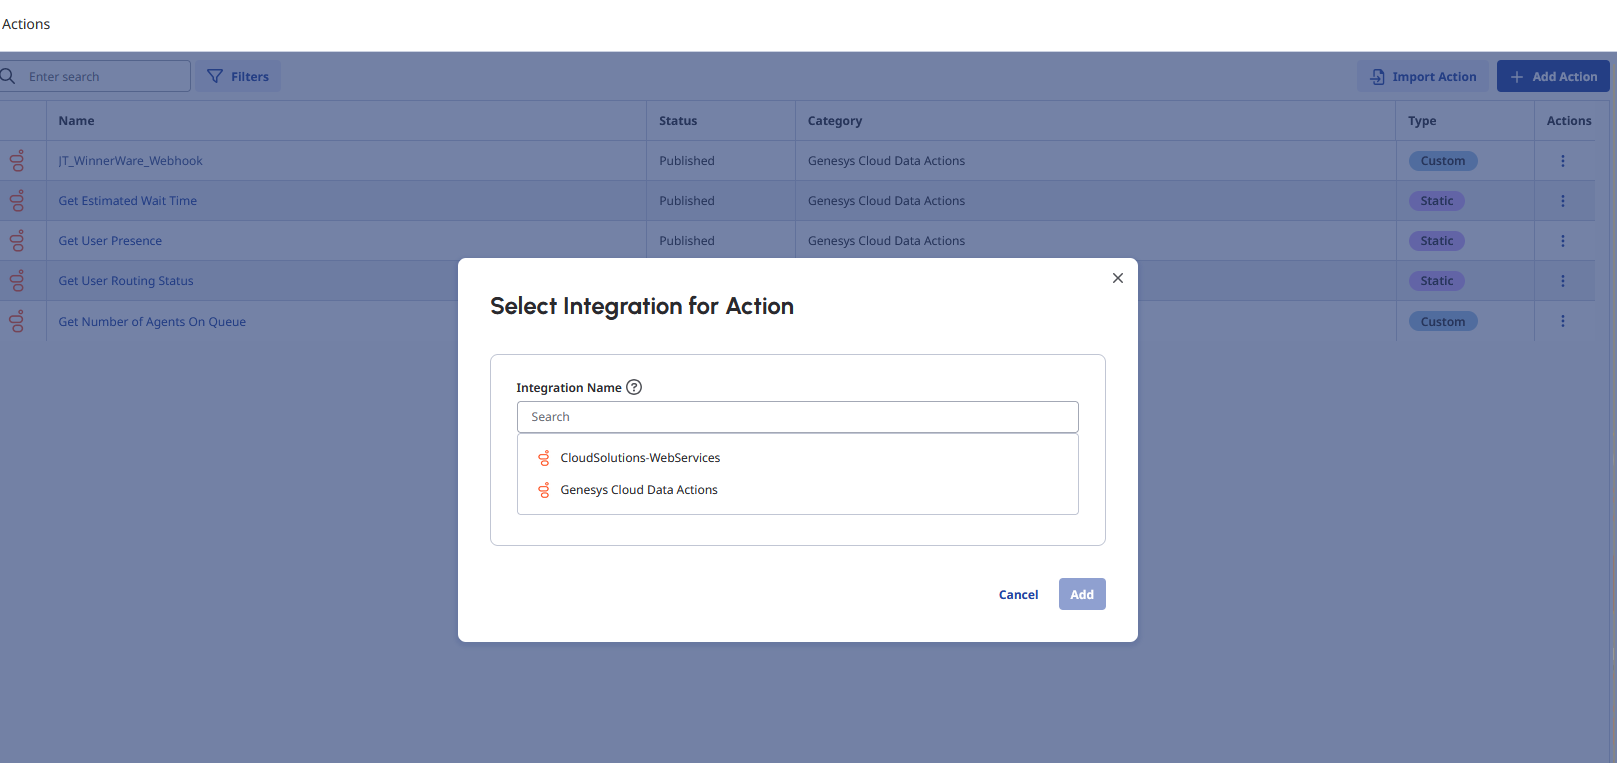
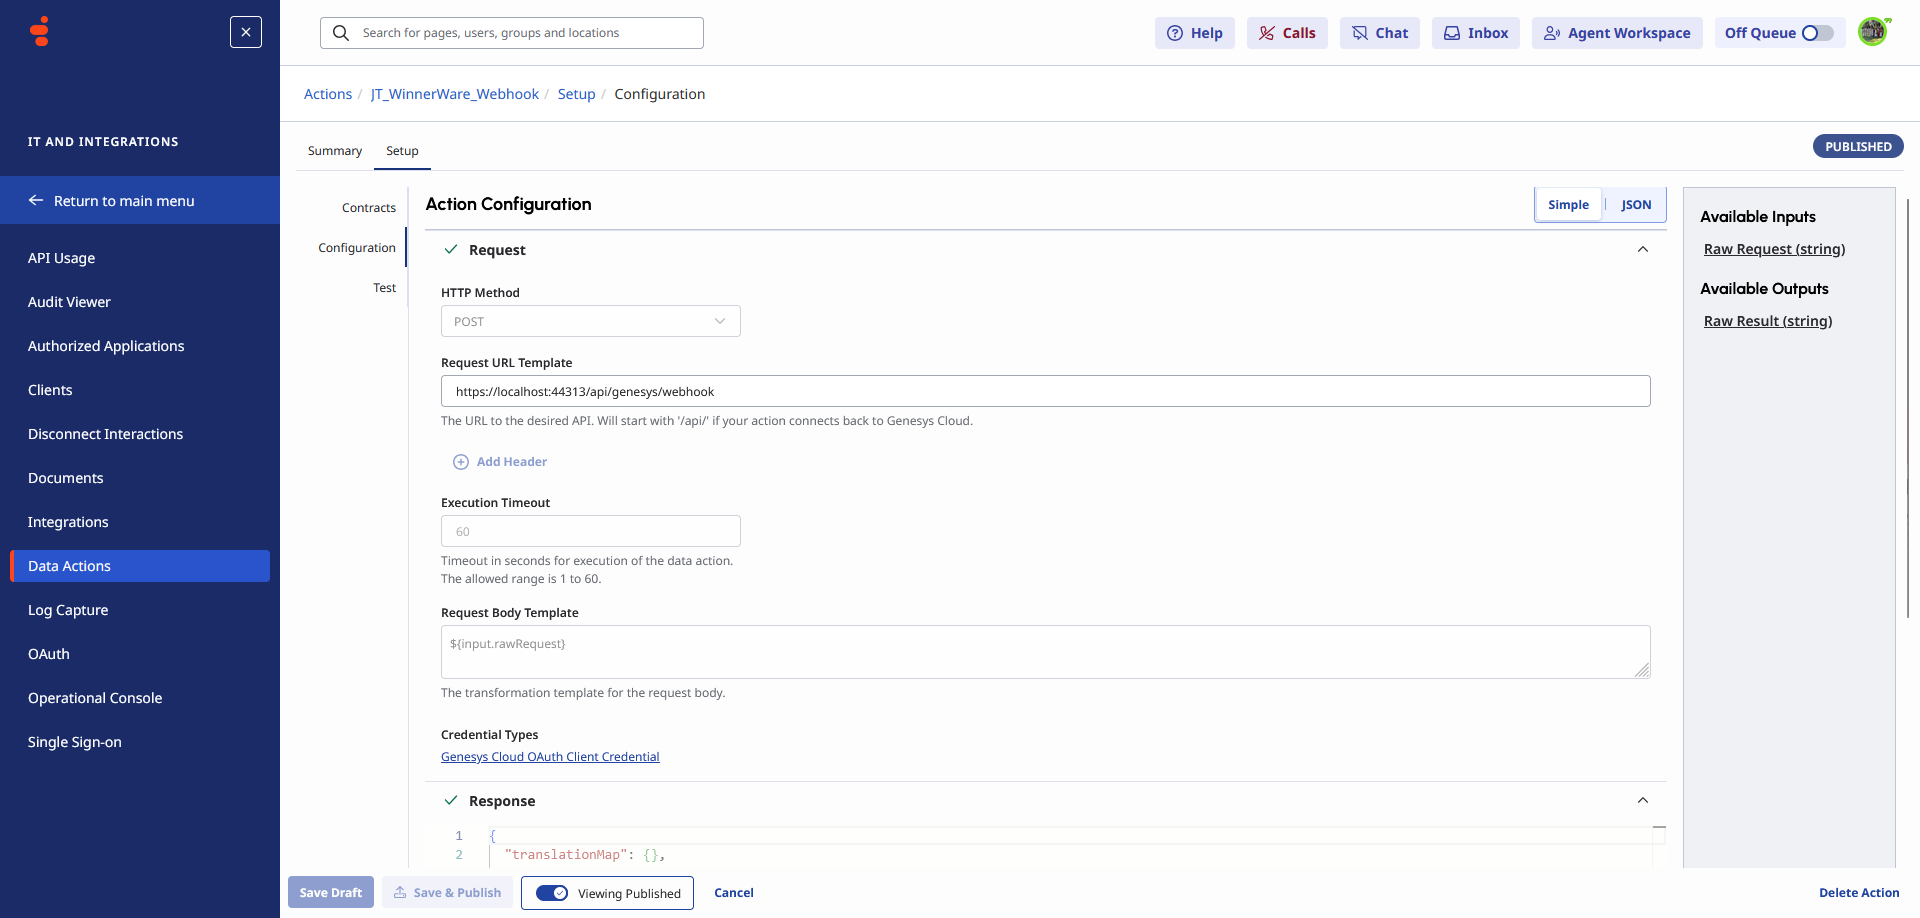
Step 4 Configure Data Actions
When creating a Data Action, you will be prompted to select which integration it belongs to. Select the integration you created earlier (e.g. CloudSolutions-WebServices). This links the action to your platform so Genesys knows where to send the requests.
On the Contracts tab, define the input and output data structure for the action.
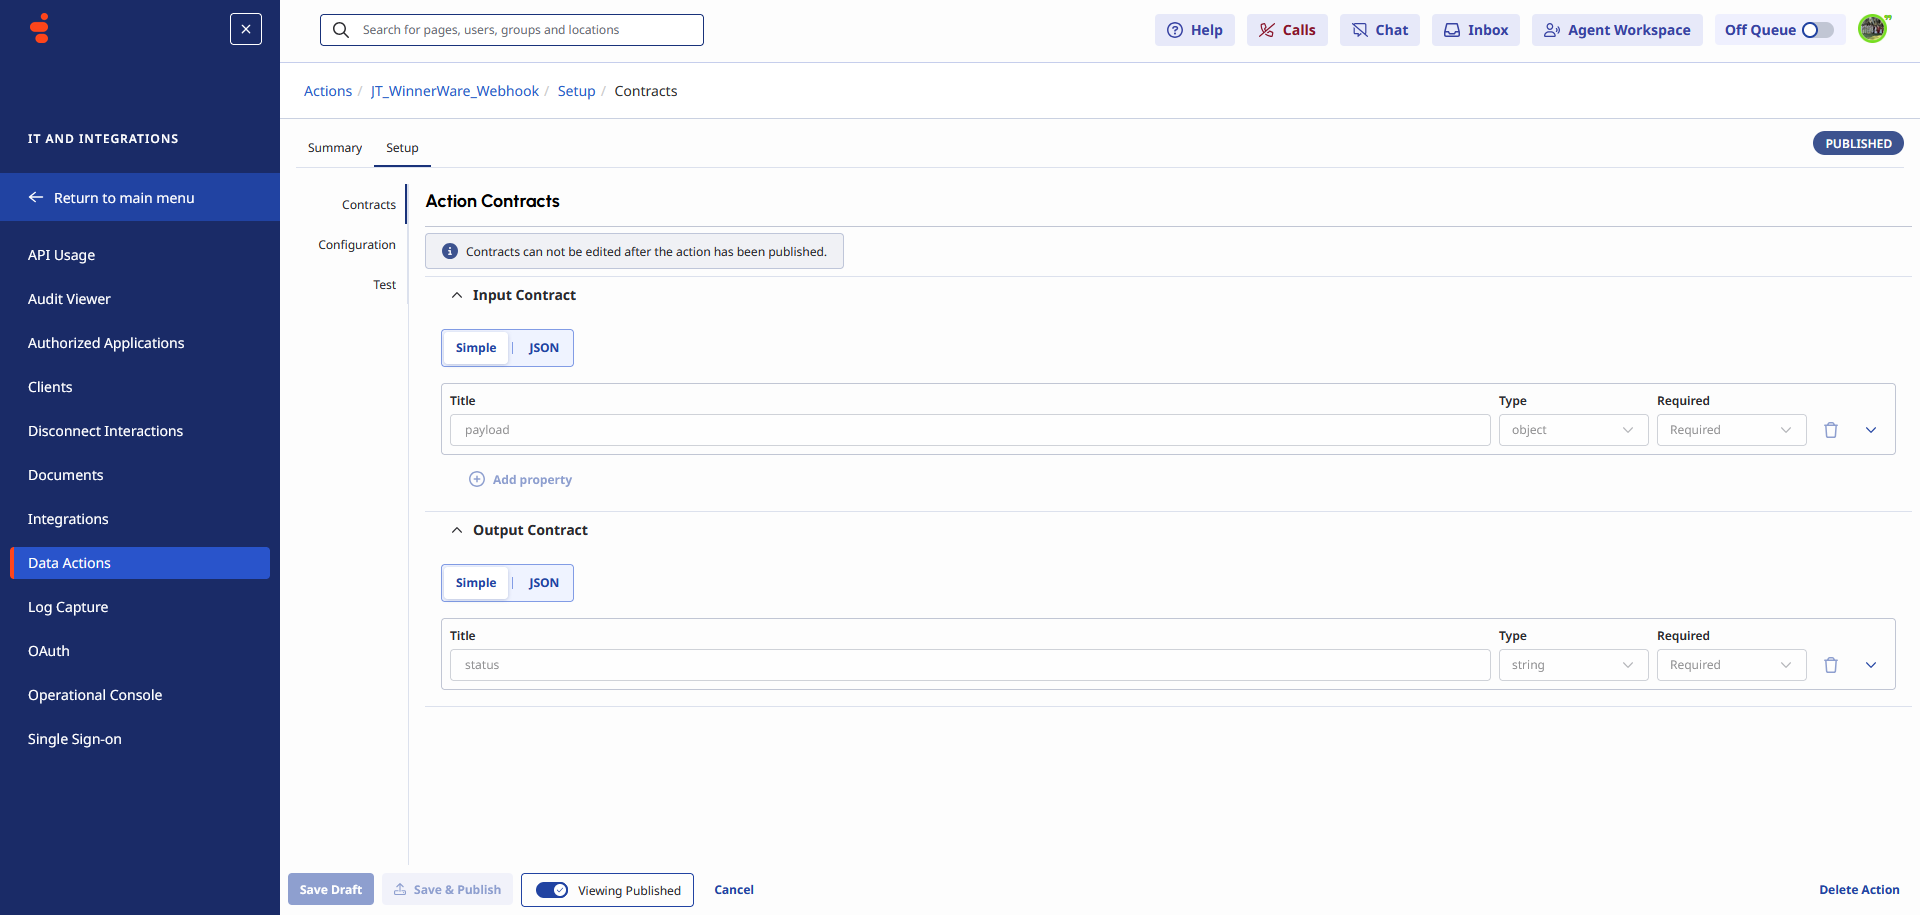
On the Configuration tab, the admin defines the JSON request that Genesys will send to your platform.
Step 5 Create an Open Messaging Platform
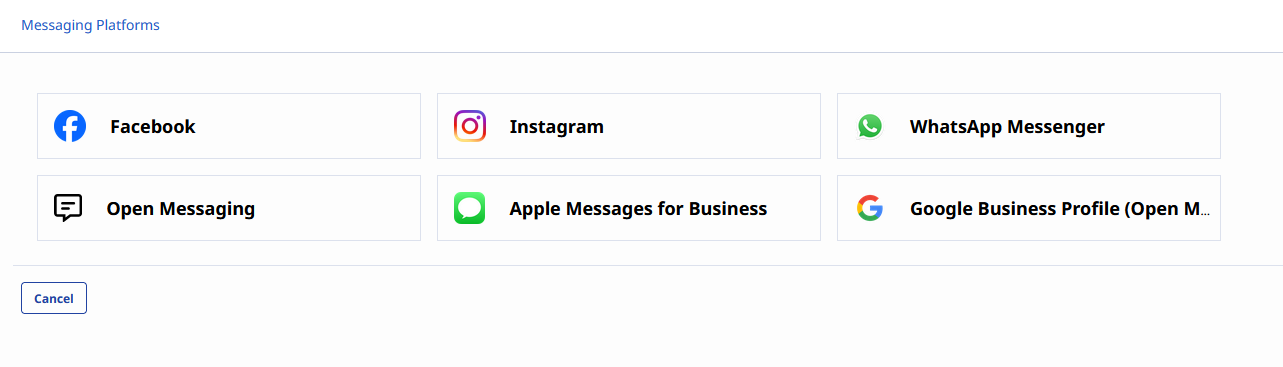
Navigate to Admin → Message → Platform Integrations. Click Create New Integration to add a new one.
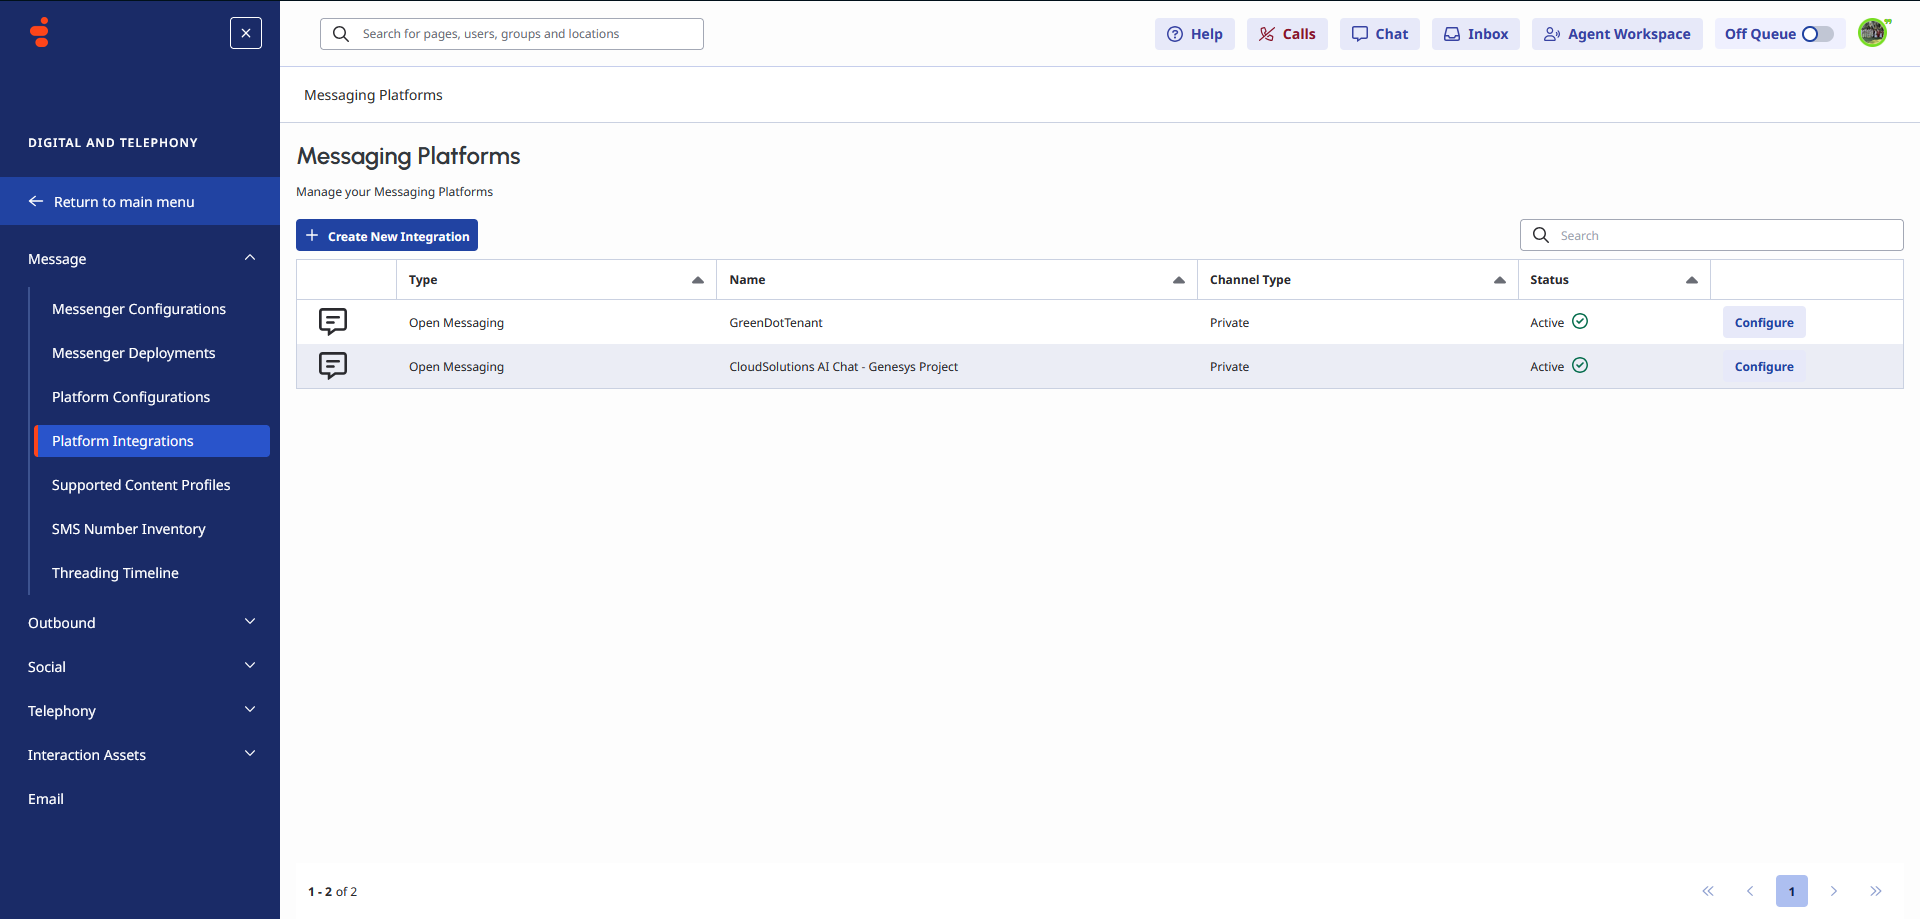
From the channel type list, select Open Messaging. This is the channel type that allows your AI Chat platform to route through Genesys Cloud.
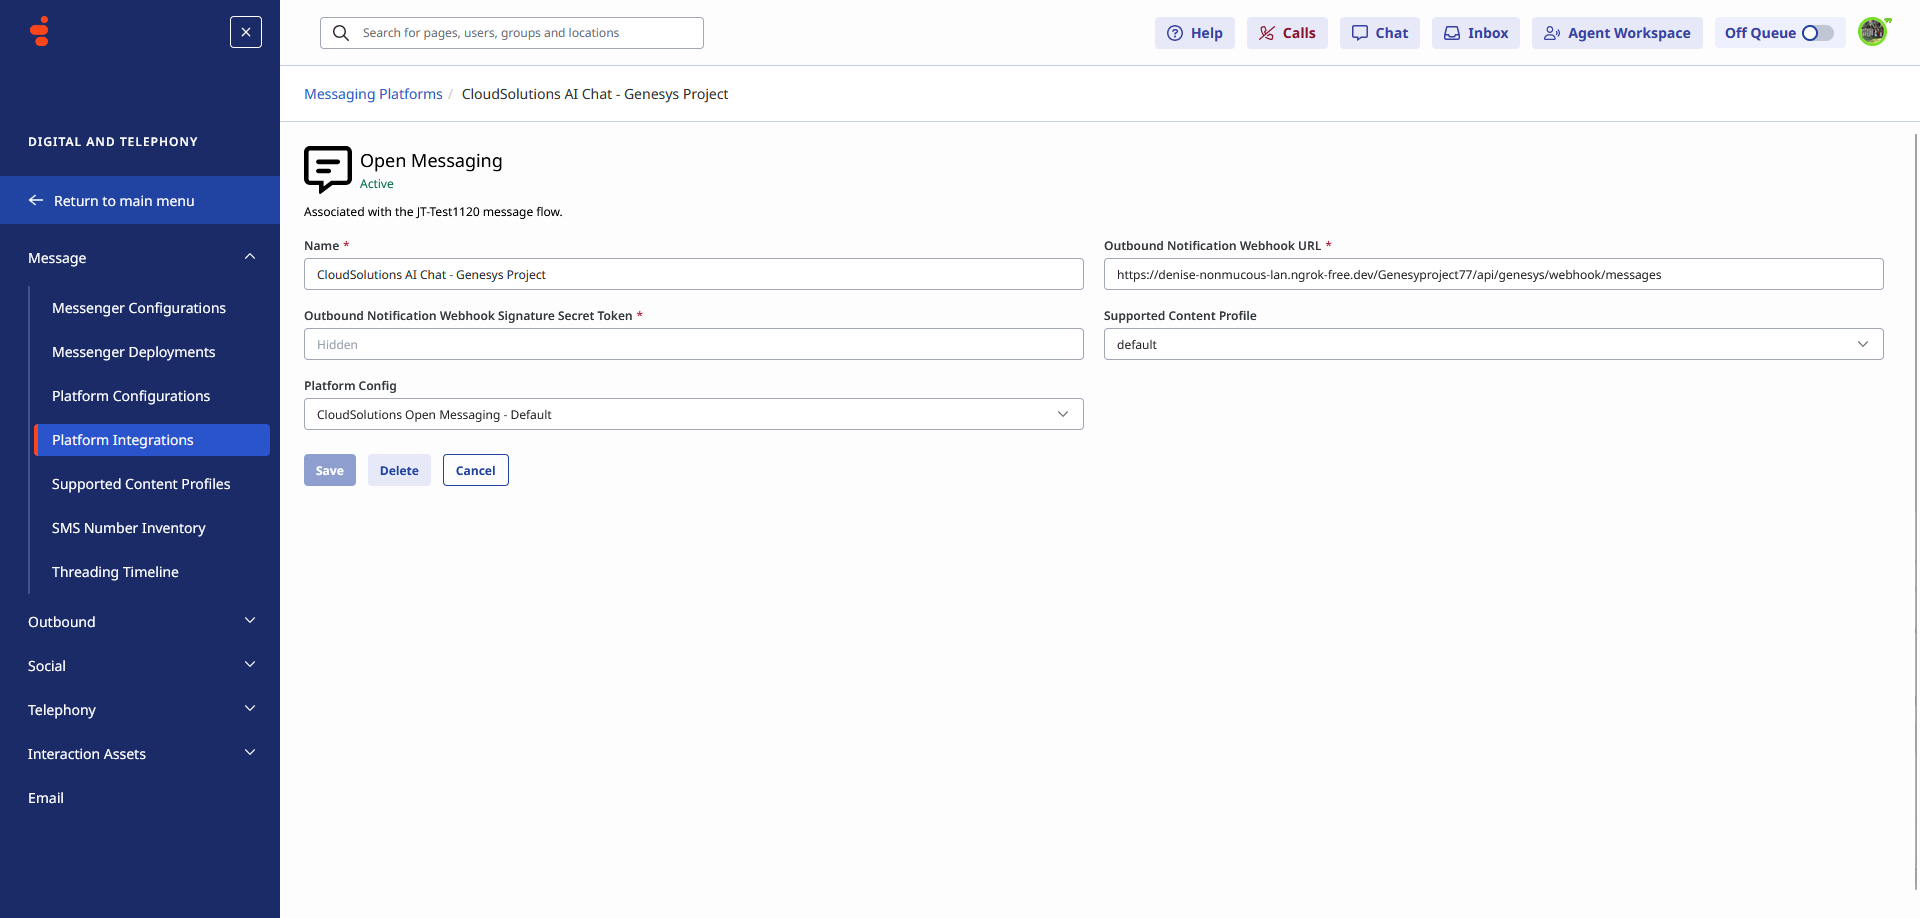
Fill in the Open Messaging configuration form:
- Name give it a meaningful name such as CloudSolutions-AI Chat - Genesys Project
- Outbound Notification Webhook URL this is your tenant's webhook URL. For example, if your tenant is TrueBlue the URL will look like
https://winnerware.ai/trueblue/... - Outbound Notification Webhook Signature Name Token create a strong secret value here (e.g. a long random string). Copy this value and keep it safe you will paste it into the Webhook Secret field in your tenant under Configuration → Settings → Genesys
- Platform Config select your platform config from the dropdown (see next step)
Click Save when done. Once saved, this Open Messaging platform will become available to select in your tenant's AI Profile → Integrations tab as the message routing channel.
Step 6 Configure Platform Config
Navigate to Admin → Message → Platform Configurations. Platform Configs define the messaging capabilities and features available on your Open Messaging channel. If you do not already have one set up, click Create Profile.
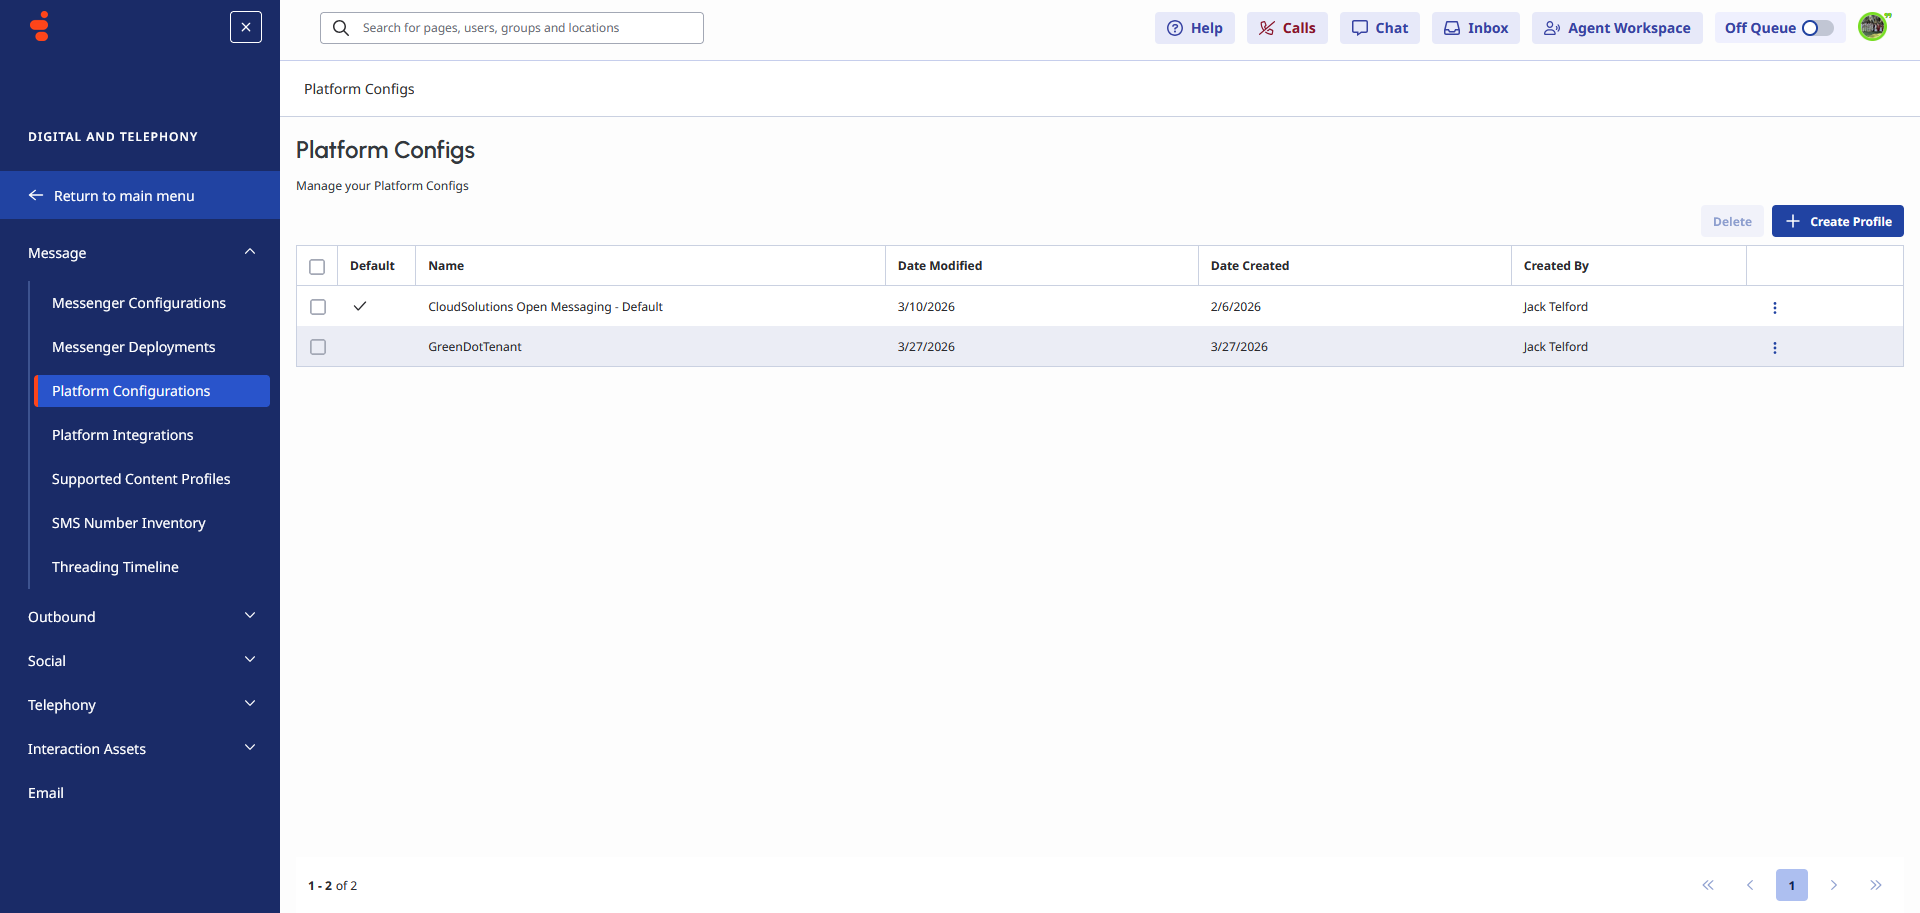
When creating or editing a Platform Config, give it a meaningful name such as CloudSolutions Open Messaging. Under Settings, enable all settings to ensure the platform can consume the full range of rich notifications from Genesys.
Click Save when done.

Step 7 Configure the Queue
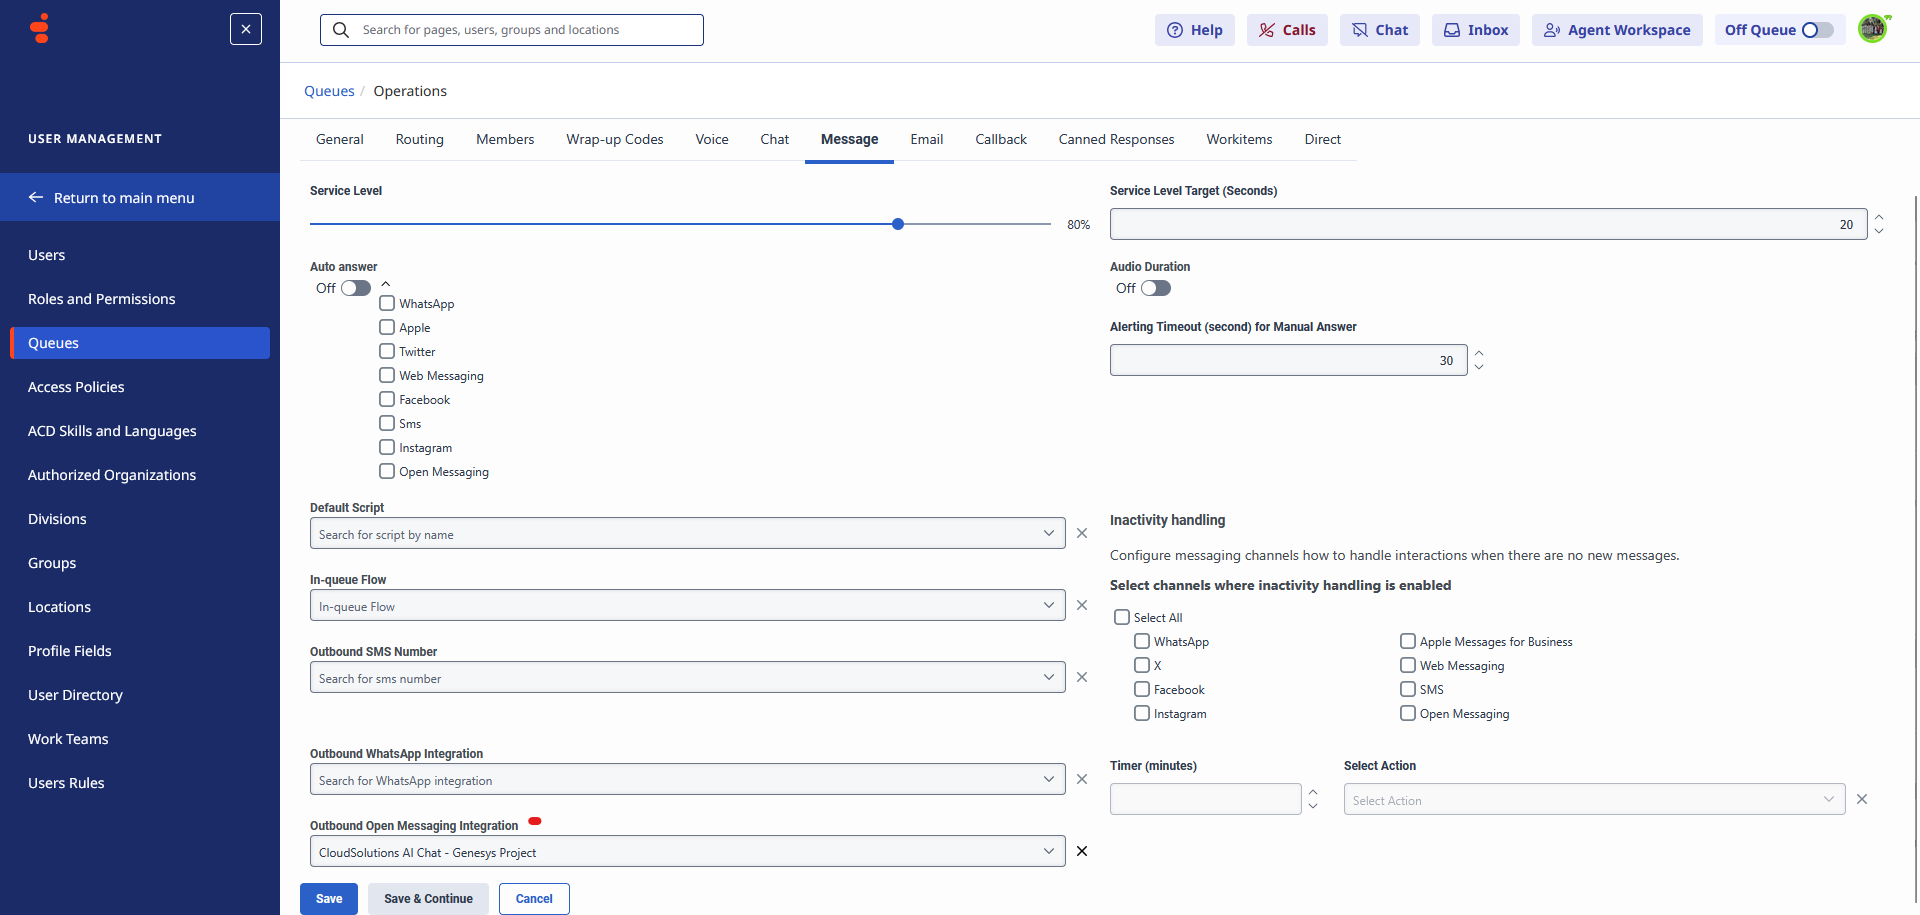
Navigate to Admin → Contact Center → Queues. Queues are how Genesys routes incoming conversations to the right group of agents. Select the queue you want your AI Chat to transfer conversations into when a visitor requests a live agent.
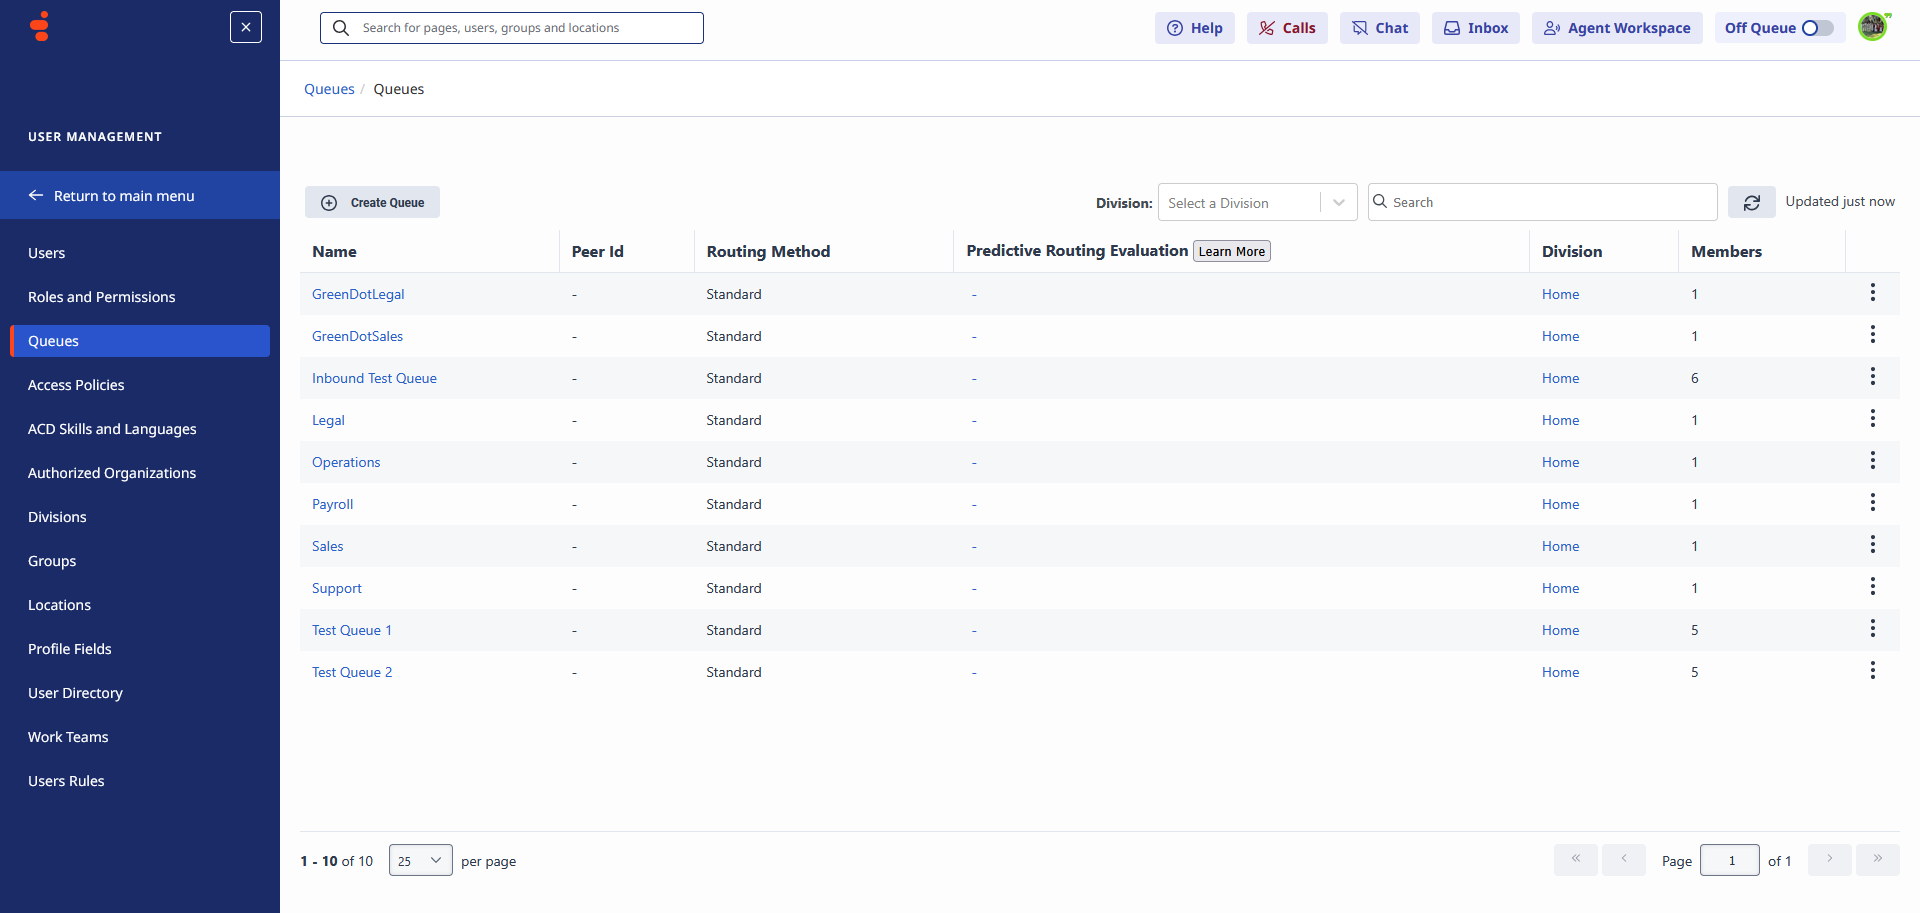
Open the queue you want to use and click the Message tab. Here you will:
- Under ACD channels enable Open Messaging so this queue can receive conversations from your AI Chat channel
- Under Outbound Open Messaging Integration select the Open Messaging platform you created earlier (e.g. CloudSolutions-AI Chat - Genesys Project)
Click Save when done.
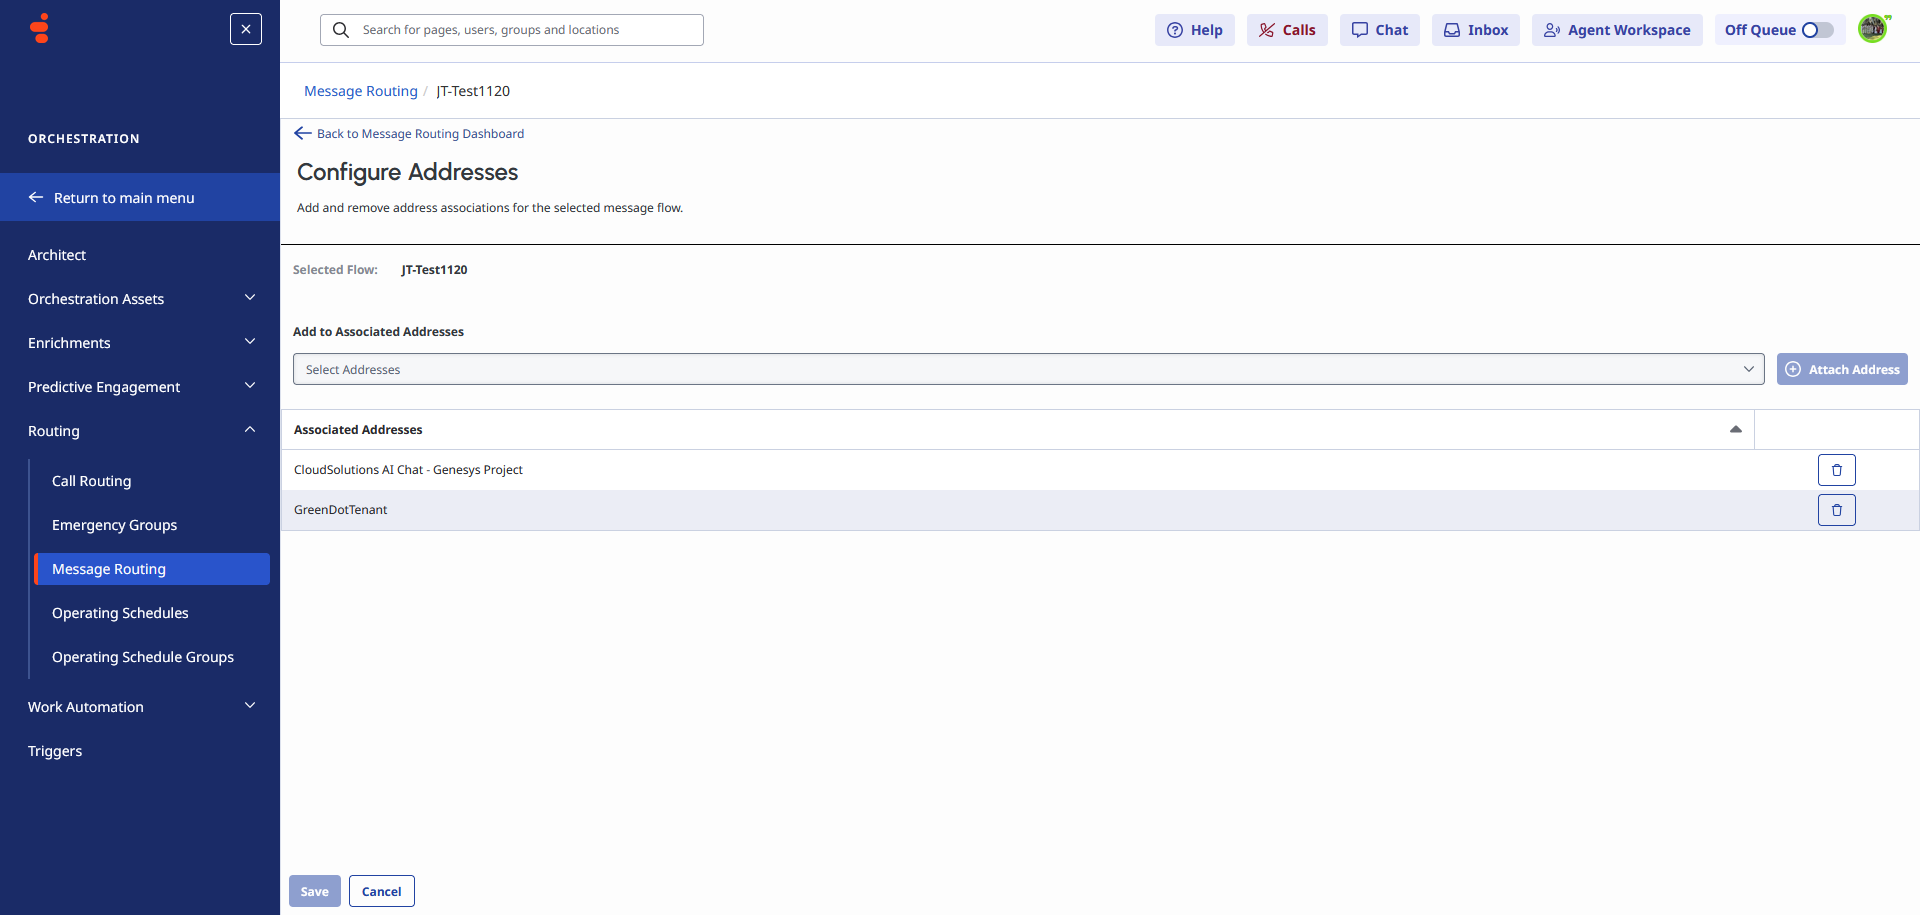
Step 8 Configure Message Routing
Navigate to Routing → Message Routing. This is where you link your Open Messaging platform to the Inbound Message Flow you created in Step 1. Click Attach New Addresses to a Flow to associate your Open Messaging channel with the correct flow.
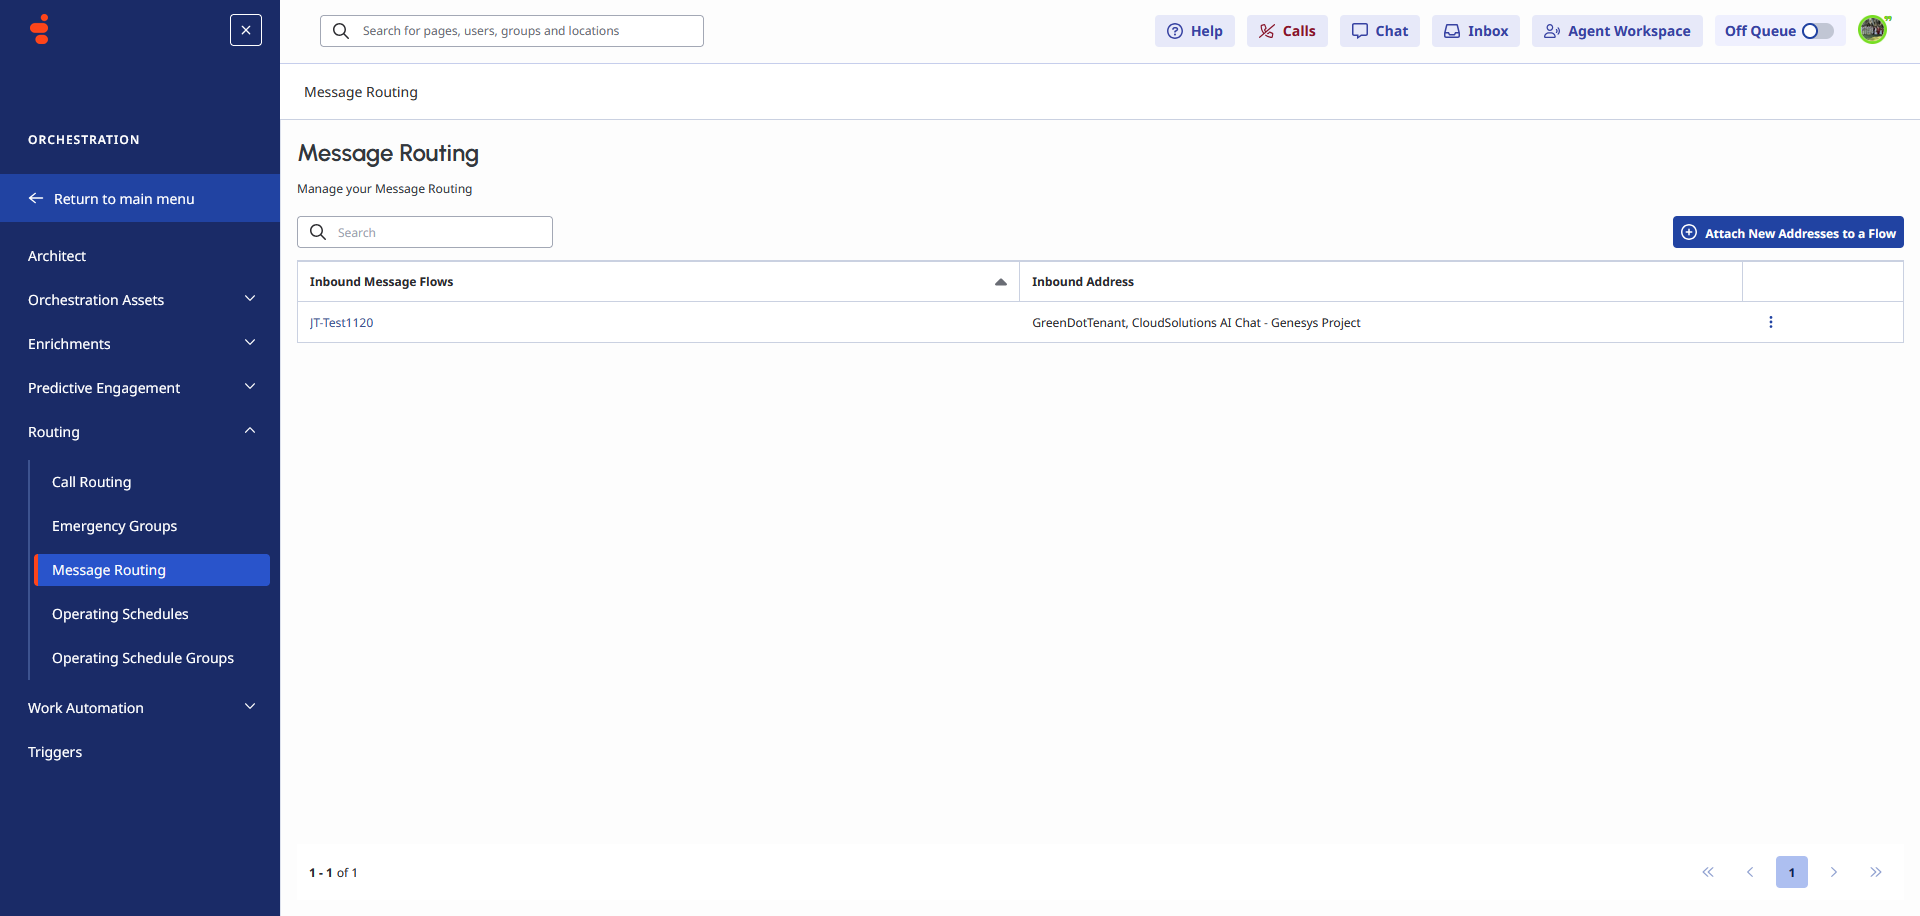
On the Configure Addresses page, select your Open Messaging platform from the Add to Associated Addresses dropdown (e.g. CloudSolutions-AI Chat - Genesys Project) and click Add Address. This links your Open Messaging channel to the Inbound Message Flow so that all incoming conversations are routed correctly.
Click Save when done.
Tenant Admin Settings
Once all Genesys Cloud steps are complete, navigate to Configuration → Settings → Genesys in the tenant admin (you must have the Manage Genesys Settings permission and be connected to the VPN).
Understanding each field
Client ID
What it is: A unique identifier for the OAuth application you registered inside Genesys Cloud.
Why it is needed: Your site uses this to prove its identity when it calls the Genesys API for example, to list queues or transfer a conversation.
Paste the Client ID copied from Step 2.
Client Secret
What it is: A private password that goes with the Client ID above.
Why it is needed: Together with the Client ID, the secret proves that the request is genuinely coming from your site and not from someone who only knows the ID.
Paste the Client Secret copied from Step 2.
Keep this value safe. Treat it like a password. Never share it in plain text.
Environment (Region)
What it is: The Genesys Cloud region your organisation's account lives in.
Why it is needed: Genesys Cloud runs in multiple geographic regions and each region has a different API endpoint. Choosing the wrong one means API calls will fail.
How to find your region: look at the URL you use to log in to Genesys Cloud.
| Login URL | Region |
|---|---|
login.mypurecloud.com | US East (Virginia) |
login.mypurecloud.ie | EU (Ireland) |
login.mypurecloud.de | EU (Frankfurt) |
login.mypurecloud.com.au | AP (Sydney) |
login.mypurecloud.jp | AP (Tokyo) |
login.euw2.pure.cloud | EU (London) |
Webhook Secret
What it is: A secret string that Genesys sends with every inbound message to your site.
Paste the Outbound Notification Webhook Signature Name Token you created in Step 5.
Tenant-specific settings vs global defaults
The platform supports two levels of Genesys configuration:
| Level | Where it lives | When to use it |
|---|---|---|
| Global (default) | appsettings.json / environment variables under CloudSolutions_Genesys | All tenants share the same Genesys account |
| Tenant-specific | Saved inside this tenant's database | Each tenant has its own Genesys account or region |
On the settings page there is a checkbox labelled "Use tenant-specific settings".
- Leave it unchecked the tenant uses whatever global settings the server administrator configured. No fields need to be filled in.
- Check it a settings form appears. Fill in the four fields above. These values override the global configuration for this tenant only.
As an administrator you should set up the environment on the Admin Settings page for each tenant so that each tenant connects to its own Genesys account and region.
AI Profile setup
Each AI Profile has an Integrations tab where you can turn on Genesys and choose which integration to route transfers through.
- Go to AI → AI Profiles and open the profile you want to configure.
- Click the Integrations tab.
- Check Enable Genesys.
- A dropdown appears listing every Open Messaging platform found in your Genesys Cloud account. Select the channel you want transfers to land in.
- Save the profile.
What if the dropdown is empty?
- Confirm you are on the VPN and can access your Genesys org.
- Confirm that the Admin Settings are saved and correct.
- Confirm that at least one Open Messaging platform exists in Genesys Cloud (Step 5).
- Your Genesys OAuth client must have the required scopes. See Genesys Cloud permissions below.
Genesys Cloud permissions
Your OAuth client in Genesys Cloud must be granted the following scopes for the module to work correctly.
| Genesys permission | Why it is needed |
|---|---|
conversations → All | Sends and receives messages |
integrations → Read | Reads the list of channels to populate the AI Profile dropdown |
routing:queue → Read | Reads available queues so the AI can resolve which queue to transfer to |
routing:conversation:transfer | Transfers the conversation to an agent queue |
To assign permissions: in Genesys Cloud go to Admin → Integrations → OAuth, open your client, and edit the Roles or Scopes section.
If your organisation uses specific queue access controls, the OAuth client's associated role must include access to each queue you intend to use. Ask your Genesys administrator to confirm queue-level permissions if transfers are failing for certain queues.
Required permissions in this platform
| Permission | Default role |
|---|---|
| Manage Genesys Settings | Administrator |
An administrator can grant the Manage Genesys Settings permission to other roles under Security → Roles.
Troubleshooting
| Symptom | Likely cause | What to check |
|---|---|---|
| Cannot access Genesys admin or tenant settings | Not connected to VPN | Connect to your organisation's VPN and try again |
| Settings form does not appear | "Use tenant-specific settings" not checked | Check the toggle on the Settings page |
| AI Profile dropdown shows no options | Wrong credentials or missing Genesys permissions | Verify Client ID, Secret, and OAuth scopes |
| Webhook events not received | Wrong Webhook Secret or wrong Webhook URL in Genesys | Compare the tenant webhook URL with what is entered in your Genesys Open Messaging platform |
| Transfer fails silently | Missing routing:conversation:transfer scope | Review OAuth client scopes in Genesys Cloud |
| Messages not received after transfer | CloudSolutions_QueueId participant data name is wrong | Check the exact casing in your Architect flow |
| Wrong region error | Environment field set to wrong region | Match the region to your Genesys login URL |
Related documentation
- AI Chat module
- For Orchard Core framework concepts, see the official Orchard Core documentation.
- For CrestApps AI building blocks and related AI integrations, see the CrestApps Orchard Core documentation.